
Shooting Multi‐Row Panoramas
Stephen Tyler https://www.flickr.com/photos/torkn2u/ All images © Stephen Tyler 2014.
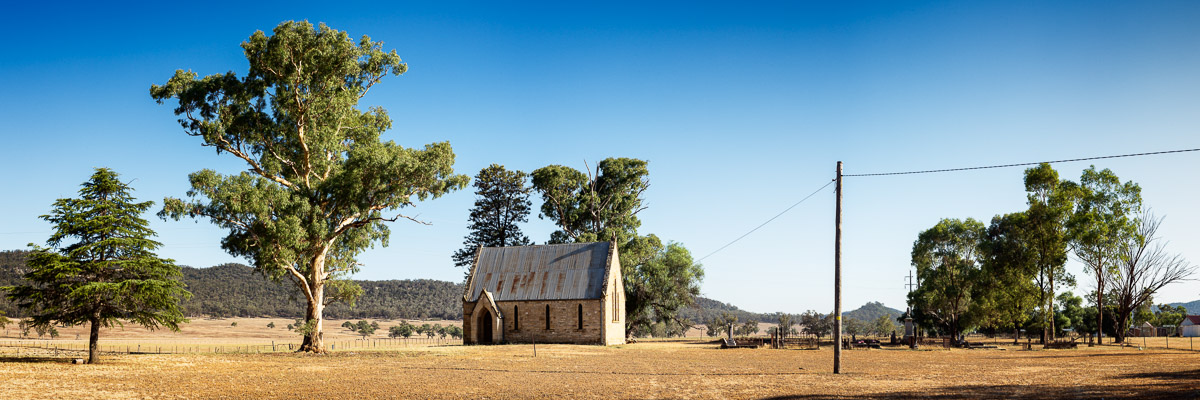
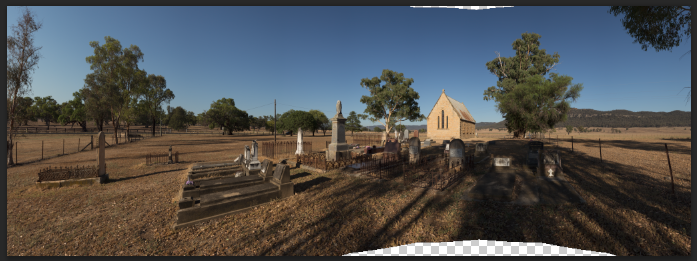
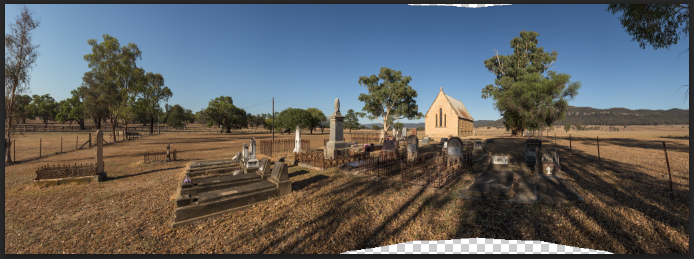
St Stephens Church, Bylong, NSW
I’ve long been fascinated by huge prints from masters like Ansel Adams (large format) and Ken Duncan (panoramic). My budget was modest, so the 617 cameras that Ken Duncan used were out of reach (although large format camera like Ansel Adams used are surprisingly affordable). I first experimented with digitally stitched panoramic images when I bought my first digital camera in 1998. Although the sensor was tiny, by joining many images together I could create a high resolution panoramic image. I’ve been hooked ever since.
Why shoot multi‐row?
Shooting a multi‐row panorama is considerably more complicated than a single row panorama. So why would you want to go to this extra effort? There are many reasons, and at different times of my photographic journey each of the following has been a primary motivator:
Higher resolution.
In 2003, Max Lyons demonstrated that gigapixel images could be taken with ordinary DSLR cameras. This is what initially attracted me to multi‐row images. http://www.tawbaware.com/maxlyons/gigapixel.htm
Wider.
Excluding fisheye lenses, single image photographs from DSLRs are limited to around 104 degrees wide (14mm lens). A stitched panorama can allow the creation of images much wider, and a multi‐row panorama is not restricted to a panoramic aspect ratio. For many years I strived to shoot familiar locations with extremely wide angle views – a new perspective on familiar scenes, and something that gave my imagery a different look.
Use the lens you have with you.
You don’t own a 14mm lens or you forgot to pack it? No problem – you can shoot the same scene with 50mm lens (or any other lens).
Shooting square.
Perhaps you prefer the square aspect ratio, but you want some of the other advantages of panoramic stitching (wider FOV or higher resolution). A multi‐ row panorama is not restricted to a long, thin panoramaic aspect ratio. You can just as easily shoot square images.
Spherical.
Immersive 360×180 degree imagery is an entire artform itself. I will not be discussing this here, but if you want to know more, check out the 360 community at http://www.360cities.net
St Stephen’s Church, Bylong NSW
I’m going to use as my example a panorama I shot of the Bylong Anglican Cemetery, in the grounds of St Stephen’s Church, Bylong NSW. The church was built in 1876, and the church and cemetery consecrated in 1881. Unlike most old churches, the surrounding area is mostly unchanged – hot, dry and dusty plains.
I had spent the weekend sleeping in a tent, and shooting motor sport in stinking hot conditions each day, so I was well beyond sore and tired. But I had passed this church a few days earlier on my way to Bathurst and knew I wanted to shoot it early in the morning as I drove back.
I arrived at this location around 8am, having already shot other locations for the sunrise and driven for a couple of hours. The sun was already higher in the sky than I wanted, and the temperature was rising rapidly, so I had to work fast.
I wanted to shoot the cemetery with the church in the background, using the lines of the graves and shadows as leading lines towards the church. And I wanted it to be an extremely wide panorama, because extremely wide panoramas is what I do.
Before you shoot
Shooting a multi-‐row panorama is much harder than shooting a single row, which is much harder than shooting a single image. It will involve a lot of time and effort after the shoot to produce the final image. So it pays to prepare for the shoot, to ensure you are doing things efficiently and properly.
Choosing a focal length
People often ask “What lens should I use to shoot panoramas?” While the question is well intentioned, it is thinking about the problem the wrong way. Any lens can be used to shoot panoramas. You should instead be thinking, “Where is the best position for the camera, so the relative size of foreground, subject and background objects is most pleasing, leading lines lead the eye where I want the eye to go, and the composition is strong?” Beginners, when faced with an interesting scene stand still, zoom their lens to frame the subject, and capture the image from eye height. I can state with almost total certainty that the optimum placement of the camera is not eye height at the point where you first observed the scene. It is somewhere else.
So first walk around the scene and work out the optimum placement of the camera. When you have found it, place your tripod on that spot, set to the desired height. There is no need to stare through the camera’s viewfinder at this stage – the alignment of objects, their relative proportions and the light quality should be readily apparent. And in any case when shooting panoramas, the camera’s viewfinder will show only a tiny portion of the scene. Use your eyes and your mind.
After selecting a viewpoint, you need to start mentally framing the image. What objects at the top and bottom do you want inside or outside the frame? For a single row panorama, the chosen lens needs to cover both top and bottom edges of your frame. For a two row panorama, the lens needs to reach about 2/3rds of the way from top to bottom to allow overlap. For three rows, about 50% of the way will give enough overlap.
Doing the maths in your head can get a bit tricky, so I carry a table showing each of my lenses, and their coverage:
| Focal length | H.FoV | V.FoV | H.Step | V.Step |
| 200mm | 7 | 10 | 5 | 7.5 |
| 100mm | 13 | 20 | 10 | 15 |
| 50mm | 27 | 39 | 20 | 30 |
| 35mm | 38 | 54 | 30 | 40 |
| 28mm | 46 | 65 | 36 | 50 |
| 24mm | 53 | 73 | 36 | 55 |
| 20mm | 62 | 84 | 45 | 60 |
H.Fov: Horizontal Field of View. The horizontal coverage of an image in degrees when the camera is in portrait orientation.
V.Fov: Vertical Field of View. The vertical coverage of an image in degrees when the camera is in portrait orientation.
H.Step: Horizontal Step Size. The optimum setting on my panoramic click rotator (a Manfrotto 300N clone) to give me a reliable overlap. Not all angles are provided as click stops – it is better to err on the side of too much overlap.
V.Step: Vertical Step Size. The optimum setting on the vertical rotation arm of my pano head. This is the row spacing, and I don’t have click stops so I have to set this using degree markings on the arm.
The chart assumes a full‐frame camera mounted in portrait orientation on a panoramic head. If you want to make your own chart, there are a bunch of handy calculators here:
http://www.tawbaware.com/maxlyons/calc.htm
With a 50mm lens, the first row covers 39 degrees (V.FoV), and each additional row covers an additional 30 degrees (V.Step). So a two row panorama with a 50mm lens (V.FoV = 39 + 30 = 69 degrees) is roughly the same as a single row panorama with a 28mm lens (V.FoV = 65 degrees). A three row panorama (39 + 30 + 30 = 99 degrees) is roughly equivalent to shooting a single row panorama with a 16mm lens (V.FoV = 96 degrees).
I often shoot multi‐row panoramas with much wider lenses (eg 20mm), but in this case, around 65 degrees V.FoV was sufficient. I already had a 50mm lens mounted on the camera from the previous shot, and thinking the image had merit, I chose to make a two row panorama to gain a very high resolution image.
Choosing a shooting pattern
Put your chosen lens on the camera, and set your panoramic click rotator to the matching setting. Looking through the viewfinder, locate the desired start and end positions of the panorama, ensuring that anything you want inside your final frame is well within the final images. It is always safest to overshoot – a slight undershoot can ruin an otherwise great composition.
In my example, I selected a 50mm lens, which required 2 rows of 9 images to encompass the scene, covering just over 180 degrees horizontally.
My preference is to shoot one row at a time, as my click rotator enables very fast and accurate horizontal movement. Vertical movement is much slower and less precise. In the absence of other factors, I will shoot left to right, starting at the bottom row, and working up. If there are moving clouds, I prefer to shoot in the same direction as the clouds are travelling. If the scene is chaotic (for example breaking waves) I will often shoot it two or more times, or wait for events at particular places. But it still helps to have a plan for the shooting pattern, so shooting can be done without distraction and to avoid errors.
Evaluating exposure
I always shoot in RAW, and expose‐to‐the‐right to minimize noise. If I think the dynamic range is too high, I will bracket exposures.
In my example, I was a bit concerned about shadow details, so I did a two exposure bracket, 2 stops apart, +0 and +2EV. It wasn’t really needed, but it is better to be cautious than sorry.
Overlap
Too small overlap can make life extremely difficult in processing. Too large an overlap wastes time when shooting. By using a click rotator, I can ensure that my overlap is perfectly even. I use my chart to know what settings on my panoramic head to use, so I don’t have to do any calculations in the field. You can do the rotation by hand, but I find that this is prone to errors, and people tend to compensate by using excessive overlap. A lot of my images are shot in the dark, and the click rotator lets me do it by feel. I use a Manfrotto 300N (clone) rotator, but the Nodal Ninja RD16‐II is also very good and fits other brands of tripods and heads.
Composition and framing
Composition of panoramic images is a black art. The conventional rules (eg “the Rule of Thirds”) seem more limiting than helpful when the image is 3:1 or wider. For example, placing the subject or horizon in the exact centre is often successful in panoramic images. In other cases, details at the extreme ends of the panorama can work well.
Different projections can alter the composition is significant ways. Rectilinear (normal lens view) has extreme stretching at the edges in wide angle views. Cylindrical projection can get very stretchy at the top and bottom edges in wide views. And most projections will cause straight lines to bend (the Rectilinear projection is an exception).
For my image of the cemetery, I saw the strong leading lines from the graves and shadows leading to the church. I thought I would place the church roughly 1/3rd from the right, and the horizon roughly along the centre. I previsualised using the Vedutismo projection, which allows a very wide view but keeps leading lines straight. I wasn’t entirely sure where I should end the panorama on the left and right, so I overshot to ensure I had enough image to work with.
Being able to visualize extreme wide projections is difficult, but it gets easier with practice and experience. When I started shooting panoramas, I would get many surprises when I went to process the images. Sadly, surprises are more likely to be unpleasant than lucky, so I lost a lot of images that couldn’t be framed properly (not wide or tall enough), or had unpleasant warping. These days, my panoramas are almost as reliable as my single images – they come out as I imagined they would, without much surprise. That is not to say they are all wonderful images – just that they technically work and match what I had planned.
Shooting
The key to reliable panoramic shooting is to make every frame the same. The same exposure, focus, white balance etc, a reliable overlap between frames, no missing frames, and sufficient frames to completely cover the final image area. So make sure your camera is NOT set to auto white balance, auto focus, auto ISO, auto exposure or any other auto-‐setting. Everything should be manual, so every photo is taken in exactly the same manner.
I meter the brightest frame, and set my exposure to expose‐to‐the‐right, narrowly avoiding clipped highlights. If the dynamic range is high, I will bracket the exposures.
I like to maintain a sharp horizon, so I don’t like to use hyperfocal focusing that renders the horizon only barely acceptably sharp. For a 50mm lens at f/11, the hyperfocal distance is 7.5m. I prefer to focus on a point at least 15m away, giving acceptable sharpness down to 5m and good sharpness at infinity. Compared to hyperfocal focusing, I sacrifice only around 1m of sharp foreground but gain 4x as much detail in distant objects.
In extreme cases I might use focus stacking. Although the foreground grass and the closest edges of the graves are well within 5m of the camera, I think the image is acceptable. Every individual blade of grass can be seen. By the time we reach the gravestones, all the lettering is sharp.
For those interested, my focusing is strongly influenced by Harold M. Merklinger’s book “The Ins and OUTs of FOCUS” available for free from http://www.trenholm.org/hmmerk/
I have a custom function set on my camera that instantly adjusts all settings to suit shooting bracketed panoramas (and another custom setting for unbracketed panoramas).
I used the following settings when shooting this panorama:
Canon 6D, EF 50mm f/1.4 @ f/11, ISO 100, 1/250s and 1/60s bracket.
2 rows of 9 images with 20 degree step between images, and 30 degrees between rows (x 2 exposures, a total of 36 images, first row ‐15 degrees, second row +15 degrees).
I used a Manfrotto 190XPROB tripod, with Manfrotto 438 leveller, Manfrotto 300N (clone) rotator, and Chinese Delicy M‐1 pano head. It is heavier and uglier than more expensive equipment, but I find it suits my needs and I have no need to upgrade.
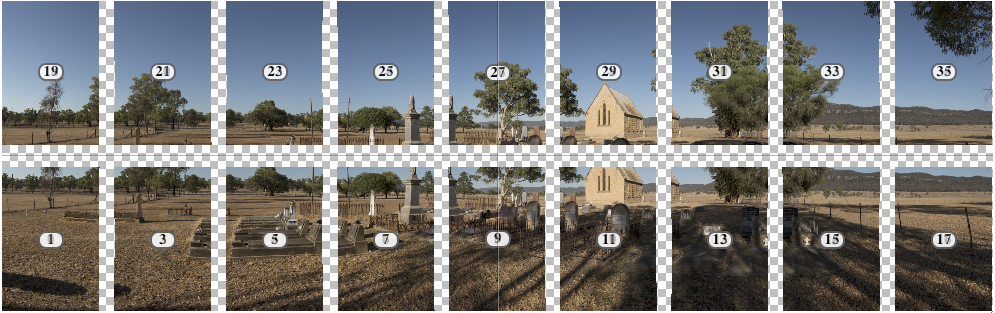
Images As Shot
Assembling the panorama
The workflow for assembling a multi‐row panorama is different in every application. I use PTGui Pro, but other good alternatives are AutoPano Giga 3, PT Assembler and Hugin. PhotoShop PhotoMerge is a popular choice, but it is difficult to fix an image if the full‐automatic operation has problems. For very high resolution gigapixel images, dedicated software like Gigapan Stitch is often preferred.
In many cases, the process is as simple as tossing all the source images into a directory and telling your software to stitch it all together. If that works for you, then there is no need to read all my instructions.
I’m a bit of a control freak, and don’t like to be at the mercy of any automated functions, whether in-‐camera or in panoramic software. If anything is not done perfectly, I like to be able to fix it properly. Hearing about people who “warp” their panoramas till they look straight makes me tear my hair out. For that reason, I use PTGui Pro as it allows manual control wherever it is needed, and I am very familiar with it. There is other good software out there, but you will need to look elsewhere for instructions.
Preparing images
I use LightRoom to manage my images. After importing the images, I make a collection for each panorama.
The key to a good panorama is ensuring that all the source images are created and processed identically. So I also make sure that I have all the images selected, so any changes are made identically to all images.
I prefer to do most of my post‐processing after the panorama is stitched. Prior to stitching, I only do the following:
- White balance adjustment
- Chromatic aberration correction
- White point, to ensure there is no clipping
- Black point, to ensure there is no clipping
- Vignetting correction. I do not do any other kind of lens correction, sharpening, noise reduction, curves or adjustments. The distortion correction functionality of PTGui is far superior to LightRoom, so using LightRoom (or DxO) to correct distortion in source images will cause minor alignment problems in the panorama. PTGui Pro has a vignetting correction module, but it sometimes causes problems in changing light. I’ve had more luck fixing it in LightRoom. Once you have worked it out once, the same values can be used for all future images with that lens and aperture.
As it happened, the images of the church were almost perfect. The 50mm prime lens at f/11 is extremely well behaved, sharp right into the corners and with negligible vignetting. My exposure was spot on, so there wasn’t anything much to adjust.
PTGui Pro can read RAW images directly, but it uses an open source library that doesn’t do a very good job. I prefer to supply 16‐bit TIFF images to PTGui, leaving LightRoom to do the RAW conversion. The TIFF images are very large, but once the panorama is created I can safely delete them knowing they can be recreated by LightRoom if they are needed again.
Grid layout
Usually the automatic stitcher can work out how your images are arranged. But if you have any images without details (like plain blue sky) it is best to start by arranging the images on a grid. In this example, I had made sure that every image contained good reference points. But since I knew all the details, it was very quick to fill out PTGui Pro’s “Align to Grid” dialog:
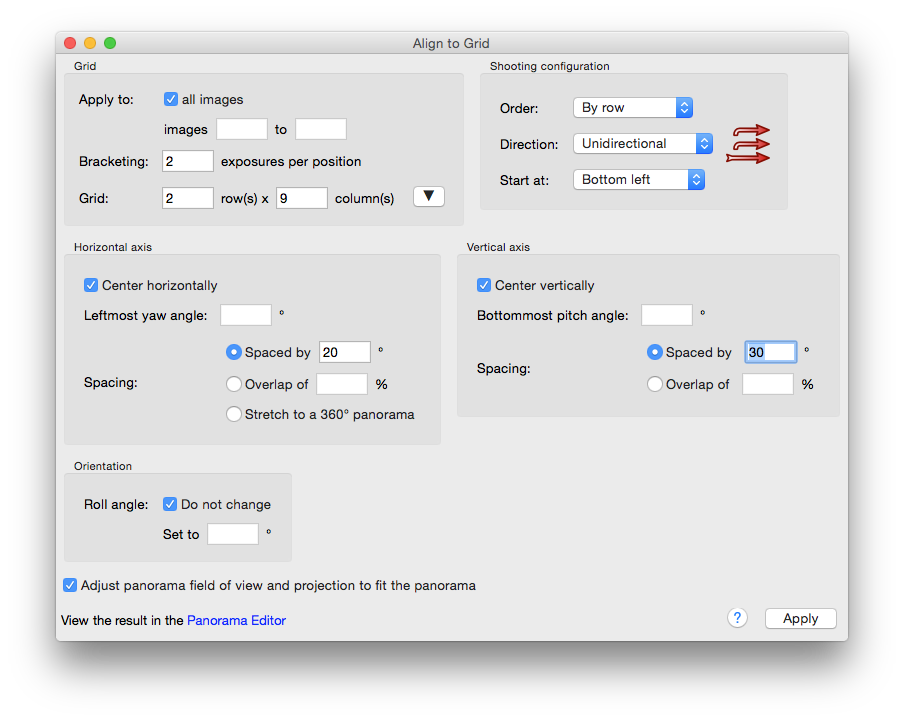
PTGui Pro’s “Align to Grid” dialogue
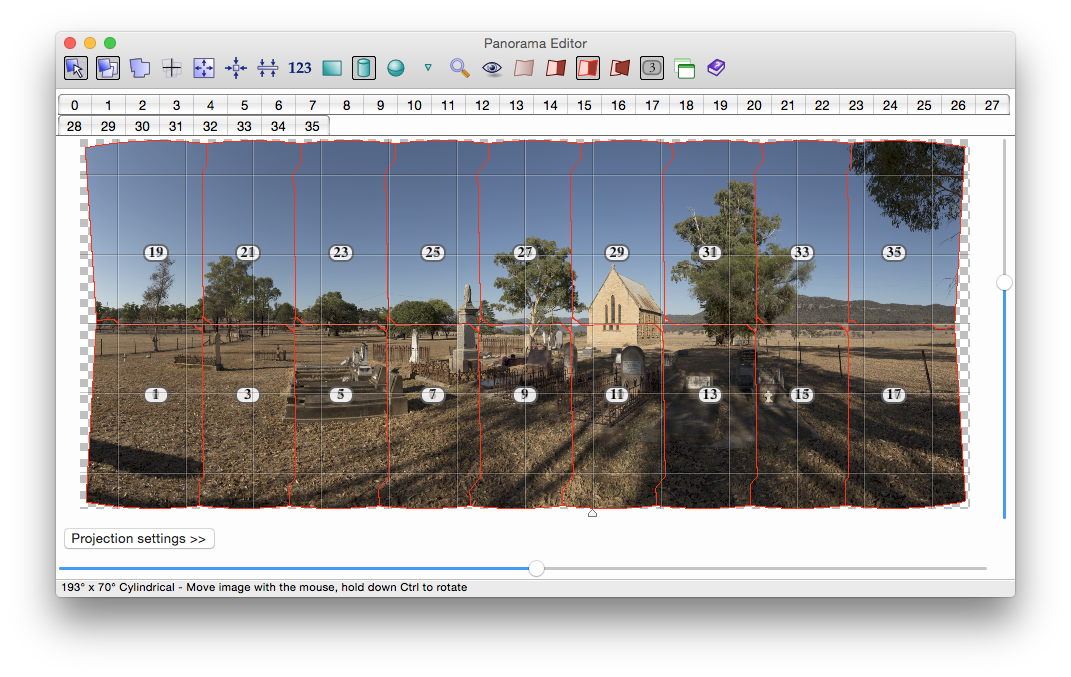
Preview in Panorama Editor
If the images are appearing in the wrong order, just run the “Align to Grid” function again with corrected parameters.
It was now time to stitch the image. If I expect problems, I might choose to manually stitch the image to ensure that all the control points are well chosen. But for this image I didn’t expect problems, so I just hit the “Align Images…” button and let PTGui do all the hard work. PTGui Pro can automatically detect bracketed images, so select “Enable HDR mode and link the bracketed images” when the dialog appears.
I like to check any control point that reports more than 2.0 pixels of alignment distance. I noted that there were a few such points, mainly located in the leaves of the trees:
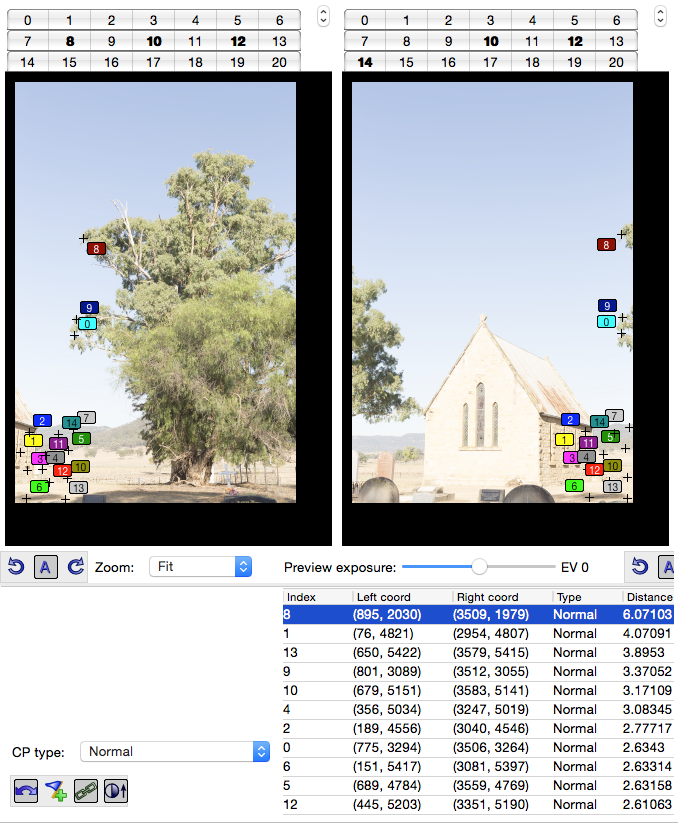
Checking the control points
After removing all points located in leaves (moving in the breeze), and adding some more control points on sharp distant objects, I had a good stitch with the average alignment error below 1 pixel, and no errors over 2 pixels.
If some of the source images contain no control points, and none can be added, you can drag them around manually in the Preview window. If you used the “Align to Grid” function earlier, they should all be in almost the correct position.
If your panorama head is mis‐aligned, you will get large control point errors for points that are close to the camera. Mis‐alignment doesn’t affect distant points. In practice I find this doesn’t matter much for grass, sand or water. But close fences and floor tiles can be very hard to repair.
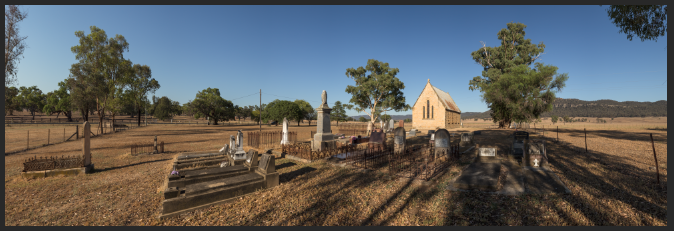
Here is how the panorama looked after I removed poor control points and leveled the panorama:
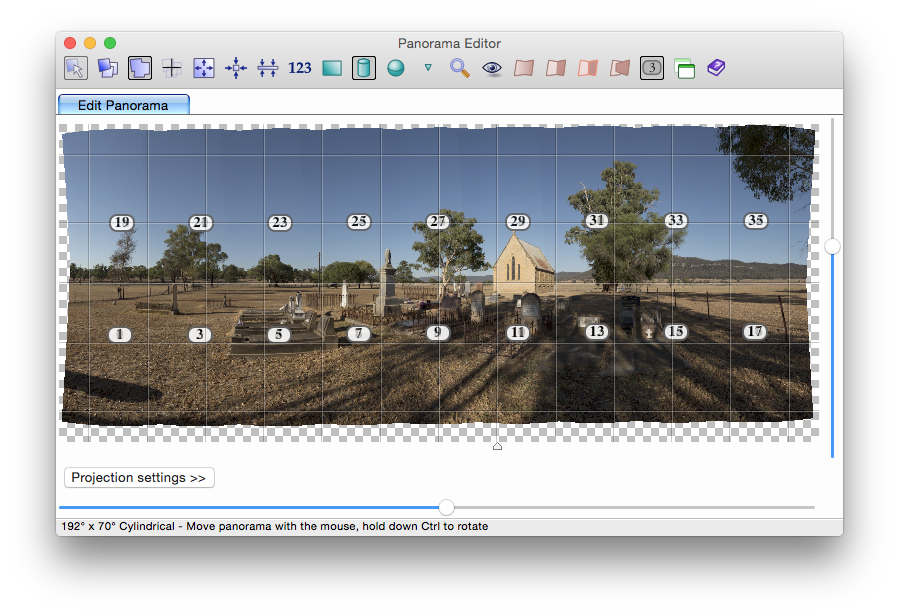
Panorama after removing poor control points and straightening
By default PTGui will select a Rectilinear projection for modest‐angled images, Cylindrical for images from 120‐340 degrees, and Equatorial for 360 degree images. Just because these are the defaults doesn’t mean that you should use these projections. For example, I almost always prefer Mercator to Cylindrical. Vedutismo is often my favourite, and in this case it was the one I had in mind.
The Vedutismo projection (sometimes called Panini) allows a much wider view than Rectilinear without apparent excessive stretching. It keeps all vertical lines straight, the horizon straight, and all lines that pass through the vanishing point. Other lines can bend.
I knew I wanted to emphasise the vanishing lines created by the graves and the shadows leading to the church. So I changed the projection to Vedutismo, centred the panorama on my desired vanishing point (just to the right of the church), and expanded the field of view to fit:
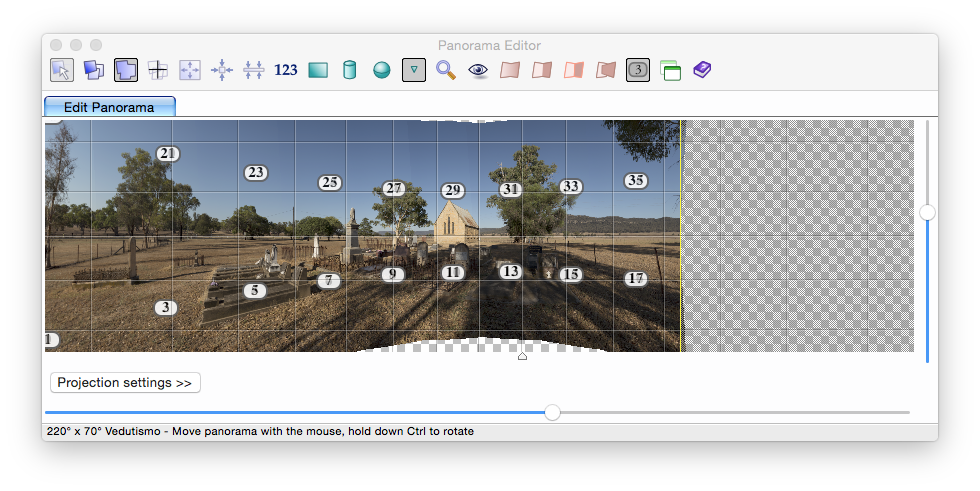
Changing the projection to Vedutismo
If I had centred the panorama (rotated it towards the right), the leading lines would have started to bend.
Now that I was happy with the panorama, I exported it to PhotoShop to complete the blending of images and process the final image.
I like to export every source image as a separate layer in a single PhotoShop file. You can do blending and HDR inside PTGui Pro, but I prefer to do these functions inside PhotoShop for best results. These were my settings:
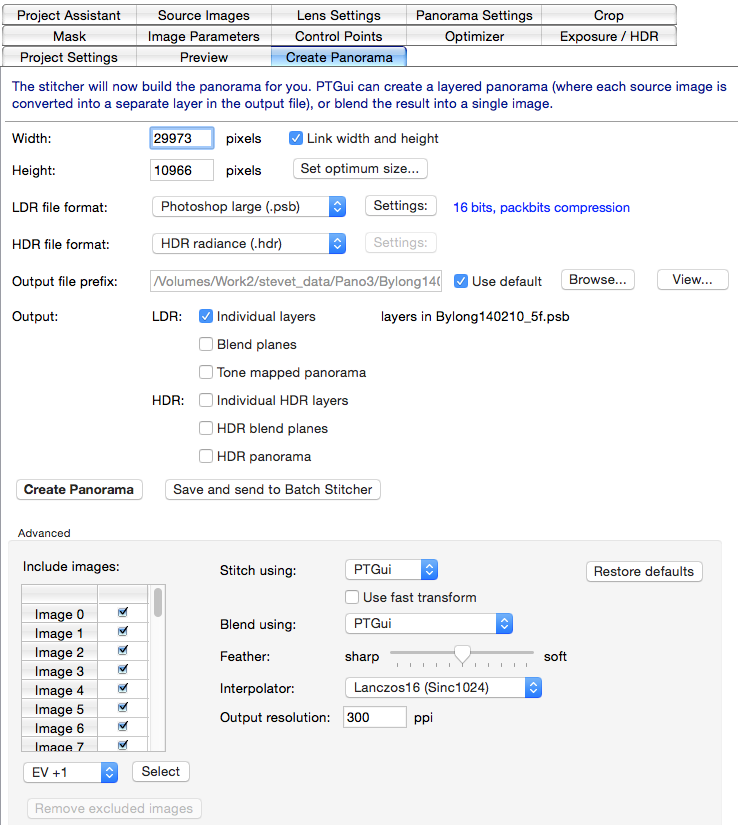
Export settings for Photoshop
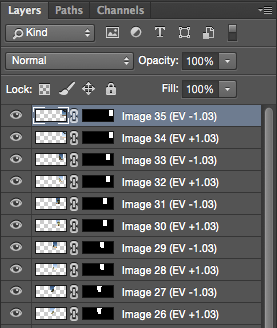
Layers as they appear in Photoshop
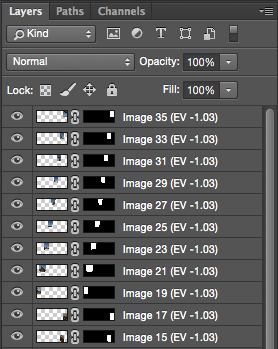
Sorting the layers so that each exposure is together
Then I blended each row of each exposure, using the “Auto‐Blend Layers…” function. I find PhotoShop’s blending function works much better than PTGui. For complex images like breaking waves I usually have to fix some mistakes in the auto‐blending by hand, using the original layers. But for images where nothing close is moving, the automatic blending is usually very good. I blend one row at a time, as the images were only taken seconds apart. The time difference between rows is much longer.
Blending each row of each exposure, using the “Auto-‐Blend Layers…”
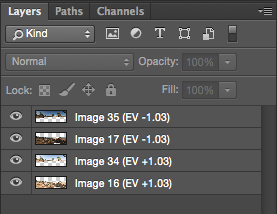
After each row was blended, I blended the rows together to complete each exposure layer:
Blending the rows together to complete each exposure layer:
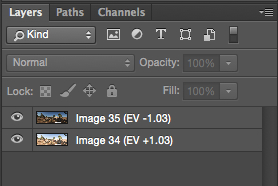
Finally, I had one fully blended layer for each exposure. This is how the ‐1EV exposure layer looked at that stage:
‐1EV exposure layer
After some mild luminosity blending, the shadows had a bit more detail:
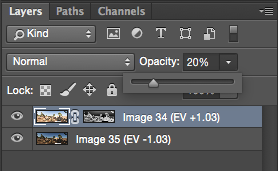
Luminosity blending
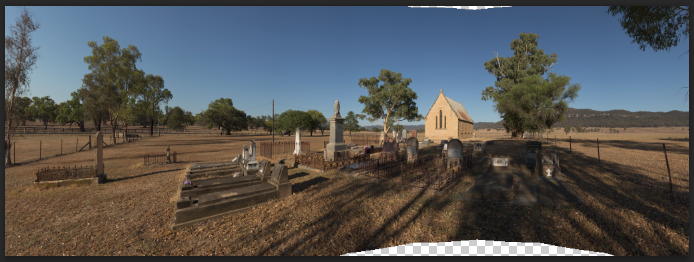
Image looking flat
Remember that I exported the images from LightRoom with almost no adjustments. So the image at this point should be looking a bit flat, unsaturated and drab. There are many ways to process an image, but my preference is to use Adobe Camera Raw on unprocessed images to give an initial enhancement. To allow me to go back and re‐edit the images, I moved the images to a Smart Layer and processed the Smart Layer in Adobe Camera Raw:
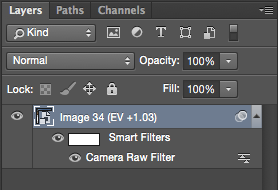
Converted to a Smart Layer
In Adobe Camera Raw, I eliminate dust bunnies, reduce noise and apply sharpening if needed, and make final adjustments to the tonal range. After processing, the image looked like this:
Final Adjustments
And then cropping to the final 3:1 proportions:
Cropping to 3:1
And after some work in Nik Silver Efex Pro 2, I created the final image:
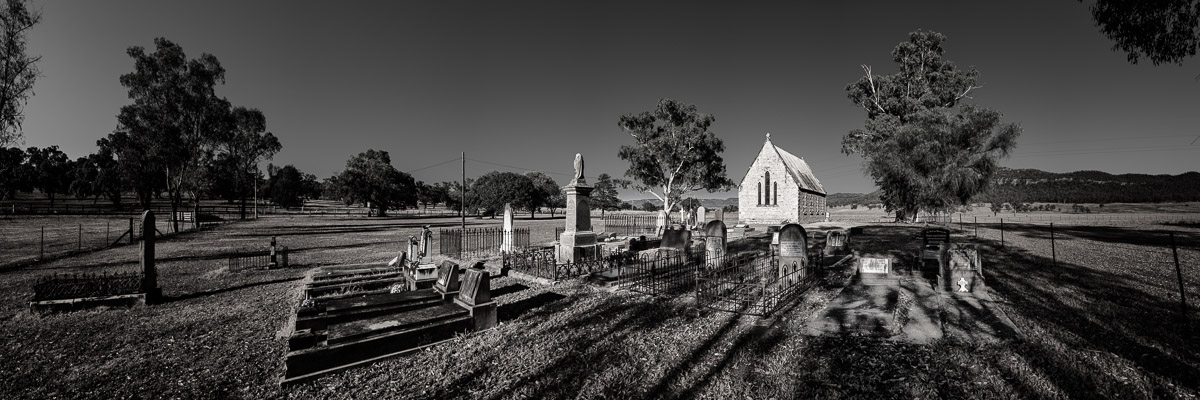
“Afterlife” © Stephen Tyler 2014, https://flic.kr/p/pF3NME
I would have preferred to be at the location for dawn, with some mist and some clouds. But under the circumstances I was reasonably happy with my efforts.
The panorama is really no different from what I could have shot as a single row panorama with a 28mm lens, except that I had the benefit of around 3x as many pixels and the better sharpness of my 50mm lens.
Learning to reliably produce multi‐row panoramas is a skill that can pay benefits when you need the extra resolution. It will not make your life easier, but it does open up some photographic opportunities and let you produce extremely high quality images from very modest equipment.
You can see more of Stephen’s work here on Flickr: