
One of the frustrations I had when I started sharing photo’s was co-ordinating sharing images to multiple websites and social media pages. Uploading to each site was time consuming and I was never sure if I had shared all of the images to all of the sites. Then you find a spelling mistake or realise there is a great big error in processing …..
Here is the system I have come up with for publishing images from LightRoom directly to multiple social media sites and keeping them in sync.
Publish Services.
LightRoom has services that connect and publish images directly to particular web services and social Media sites. Unfortunately not all are created equal.
Flickr
The native publisher to Flickr works really well and will:
- publish images including Title, Caption, Keywords and Exif
- Allocate images to Sets / Albums on Flickr based on the name of the collection in the publishservice(default is direct to your Photostream,)
- retrieve comments and fave details back into lightroom
- update the image for any changes in processing, tags or caption/title
The included Facebook publisher is very limited. It will upload a photo, but will not publish Descriptions or EXIF and will not synchronise changes.
I have found the best option for publishing to Facebook is to use Jeffrey Friedel’s plug in. It is donation ware with a 1 month free trial and a minimum donation of 1 cent.
The JF plug in adds the ability to format a description which includes Title, Captions and EXIF data. Facebook does not allow substitution of photo’s however, so a change in a photo will result in a repost rather than an update.
You can set up separate Publish services for each of the pages that you manage (eg personal page, and Photography Page)
Google+
There is no included publisher for Google +. An add on is available from the adobe store for $10 (Upload to Picassa Web). I have not tried this add on.
Personally I have found the method that works for me is:
- Export to Hard Disk to a predefined location (LightRoom will create subdirectories based on collection name within the Publish Service)
- Use a local installation of Picassa (Free from Google – very good photo library software) to monitor this folder
- Set “Sync to Web” on this folder
The advantage of this method for me is:
- I use Picassa as the library software for my JPEG’s anyway, so it is a natural fit
- This means I have a watermarked JPEG version of all the images I publish on a local harddrive, which I can use for other purposes (emailing, slide show display on the smart TV etc)
(This is from a windows user perspective – not sure how this would work on a Mac)
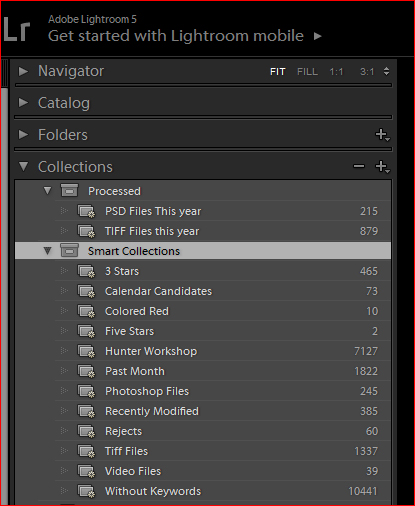
Using Smart Folders
LightRoom has the concept of “Smart Collections” in the Library Module. These enable you to create a collection dynamically based on any attribute of any image in your catalogue. Think of it as a saved search or filter.
So for example:
– all images with 17-40mm lens within the last 3 months with a rating greater than 3 and shutter speed of greater than 5 seconds
– any image that is not Raw or JPG processed in the last 2 weeks that has a colour label of green
LightRoom comes with some good examples in the Smart Collections folder.
Using Smart Collections – Lightroom
Here is an example of a collection I created to catch all of the photo’s I had processed in Photoshop or other external editors of my trip to South America. I needed a way of easily finding the ones I had edited as the images were spread across multiple folders (nested folders of country and Date).
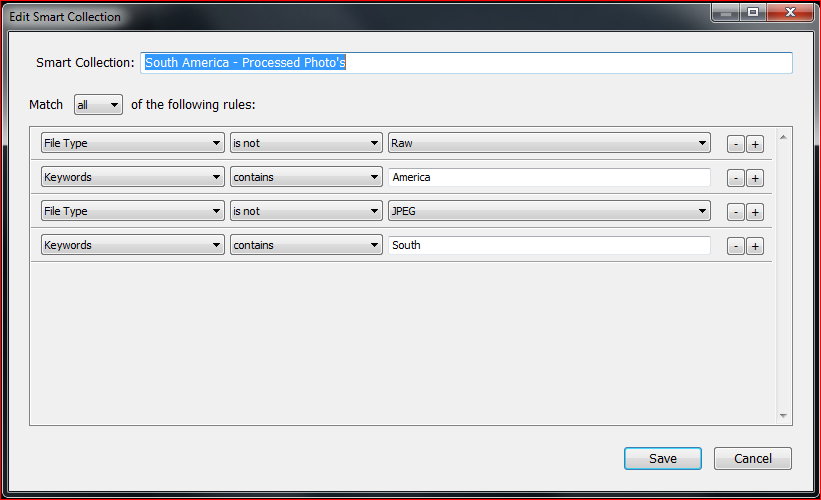
Using collections to find processed photos
Using Smart Folders with Publish Services
Once you have set up your Publish Service (where you are publishing to), you can set up Smart Photosets (aka Smart Collection) within each Publish Service.
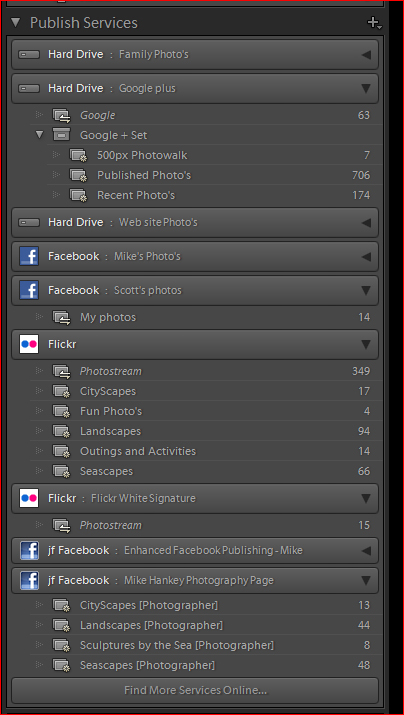
Publish Services – Lightroom screenshot
This is where the magic happens!
I have set my publish services up with a consistent set of rules in the smart Photosets. The Photosets look for the following keywords:
– “Published” – this is the starting point. Nothing gets published unless I add this keyword to the image
– “Category related Keyword”. I use a relatively small set of keywords to drive the album which the image is published to (Landscape, Seascape, CityScape, Activity etc) Each smart photoset looks for one of these keywords.
As the keyword is added, the Smart Photoset will automatically pick up the image. As the various publish services are looking for the same keywords, I know that as soon as I have added the key words (eg Published, Landscape) the image will immediately be available to publish in all of the Publish Services.
Below is the configuration my
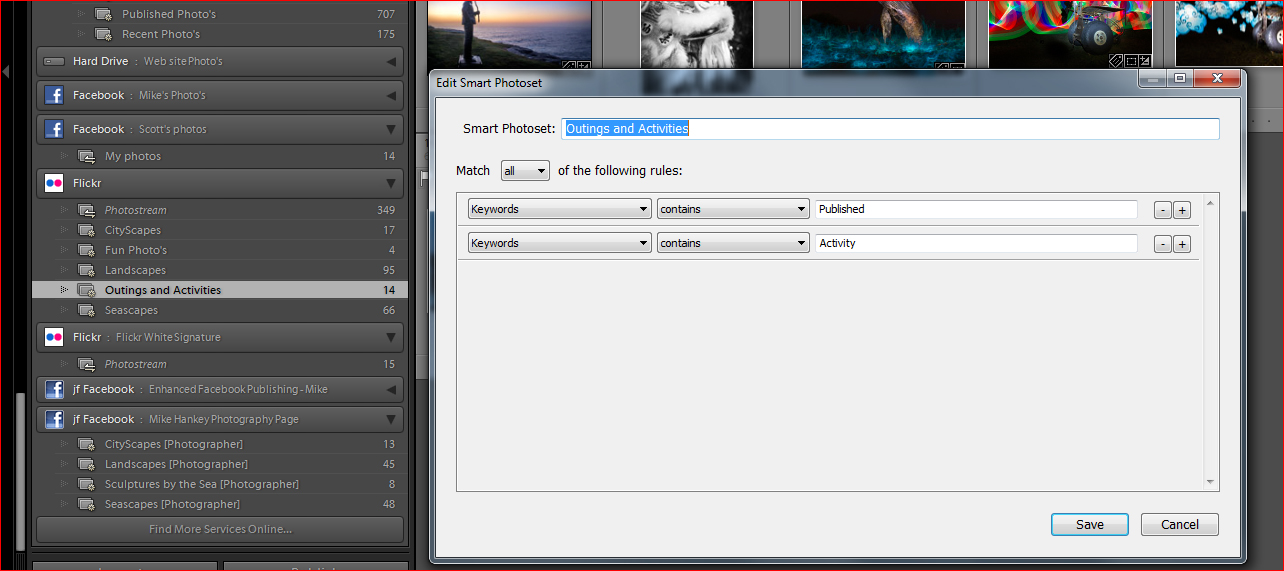
“Outings and Activities” Smart Photoset
So here is an example in action.
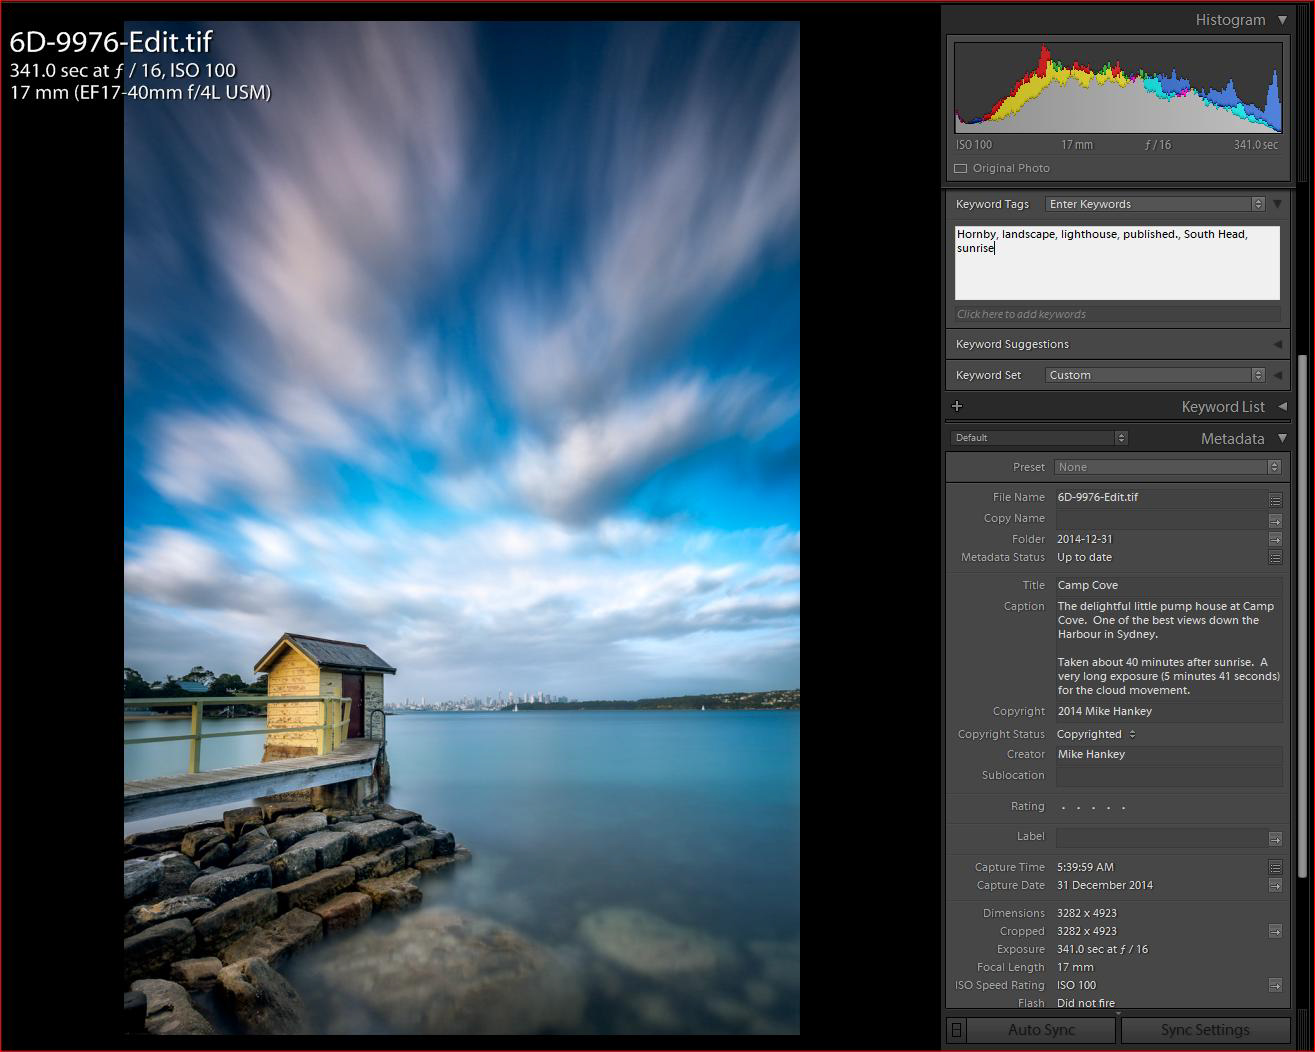
Adding the Keywords “Published” and “Landscape” to the image
And the image is immediately available in each of the Publish Services. Just press Publish when you are ready.
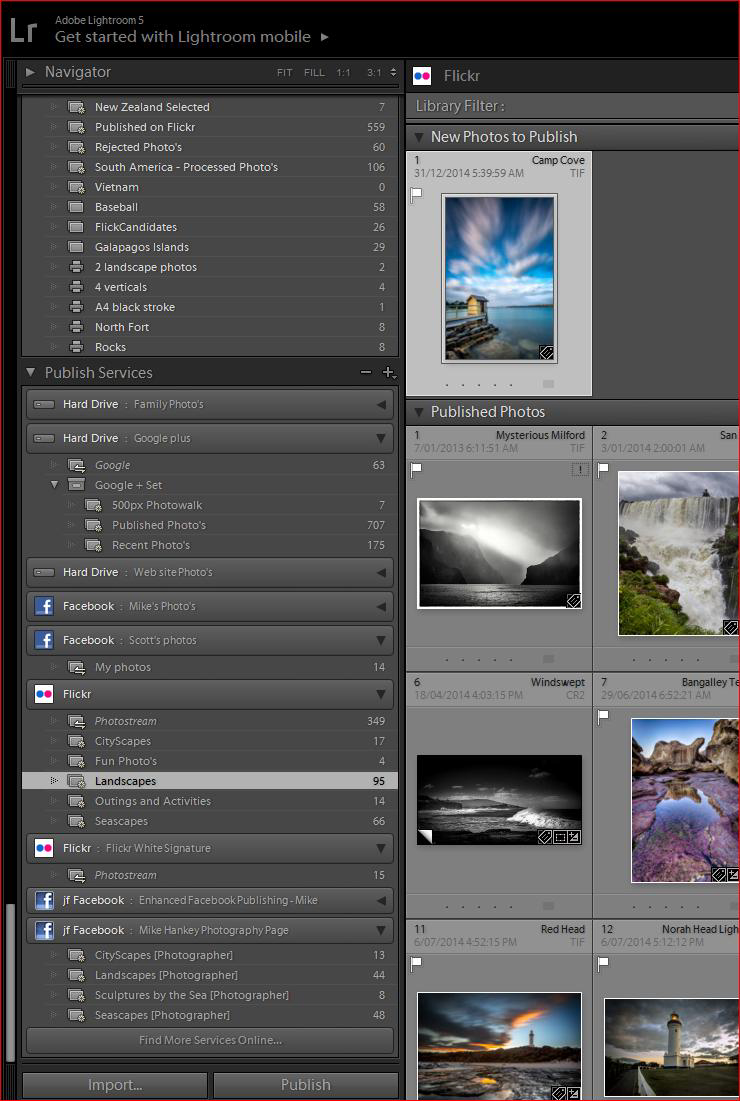
Publish to Flickr
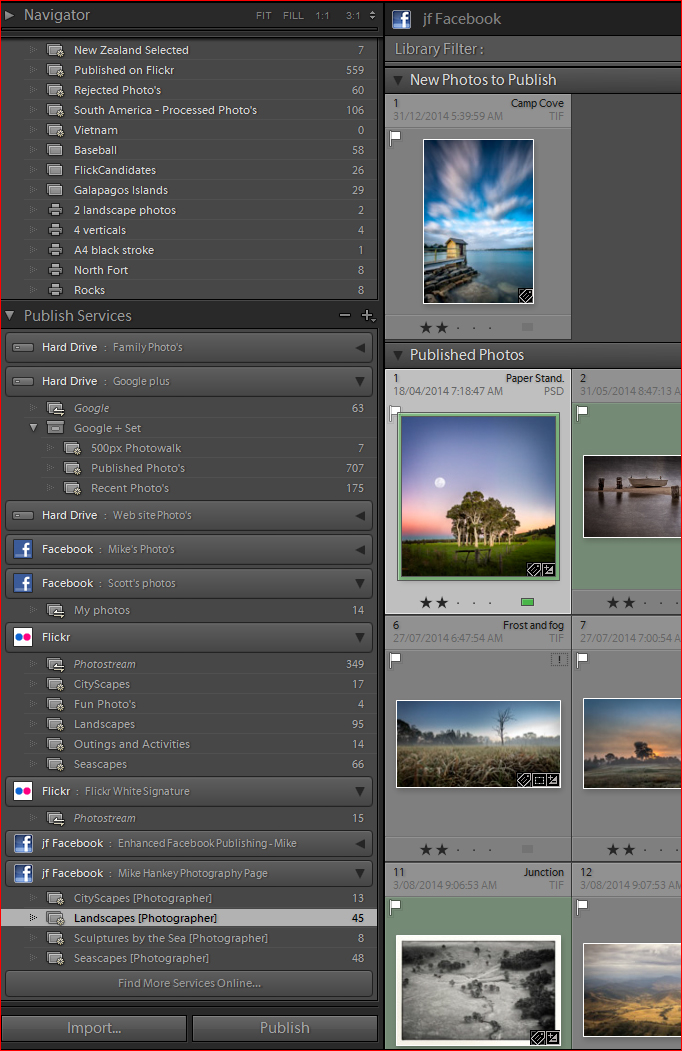
Publish Landscapes to Facebook
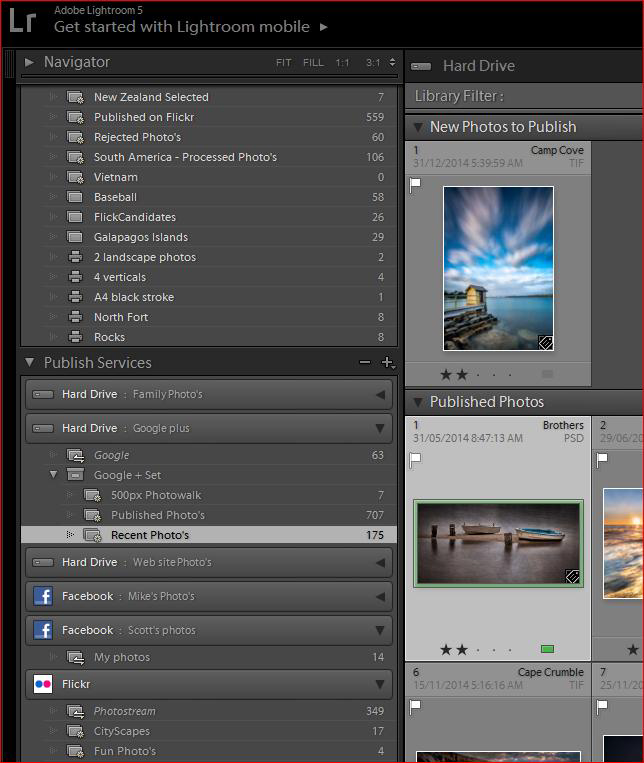
Publish to Hard Drive
You can see more great photos by Mike Hankey on: