
– By Steve Arnold
If you’ve recently bought your first DSLR camera or just haven’t gotten around to exploring all the features of the one you’ve had for a while, try this simple technique to create some photos with a real wow-factor and get your creative juices flowing.
When I first realised the awesome effects that could be created in a still image using just a few simple long exposure techniques it was a massive revelation to me and gave me a truck-load of inspiration to go on and explore what else was possible.
So if you haven’t tried switching your camera out of “Auto” and want to really impress yourself and others with some out-of-the-ordinary photos, then read on!
So, what is a long exposure anyway?
Just to cover all bases I’ll get right down to the basics for a moment. A long exposure is what happens when the cameras shutter is open and the sensor (or film) is exposed for longer than “normal”. “Normal” being the fraction of a second it takes to make a nice, sharp image.
Usually the last thing you want to see in your photos is any blurring from people or things moving while you are taking your shot, but with a little bit of creativity you can turn this into something really cool.
Effects you can create with a long exposure
The ways I usually use long exposures can be split roughly into three groups.
Make a dark scene brighter
Using long exposures you can make pretty much any dark scene appear bright as long as there is at least a faint hint of light being cast on it. A popular example would be a night-time photo of a city skyline or a landscape being lit only by the light from the moon.
Capture the movement of objects (people)
Recording peoples movement in a still frame is probably one of the trickiest things to get right but when done well it can create some stunning photos. Holding your camera still whilst people move around in front of it will create ghostly images of them across the frame, whilst if you follow a persons movement you can keep their image sharp whilst the scene behind them becomes blurred.
Using the same technique on cars can also create some really interesting images.
Capture the movement of things in a landscape (water, clouds)
This is by far my most common use of long exposures that I see being used in the photography circles I hang around in – and is the one which I am going to get you started with today. It involves keeping your camera still on a tripod and exposing for anywhere from a few seconds to several minutes whilst letting the movement of clouds or water kind-of paint itself on your image.
Here’s what you need
- A camera that gives you control over the shutter speed.
- A tripod or some other way of keeping your camera completely still. Sitting it on a wall works just as well but it’s harder to point it where you want.
Got that? Ok, now for a tiny bit of ground work
Before you head out to shoot your first long exposure photo you should spend a few minutes learning where the settings are on your camera and how to change them in the dark, since you will be shooting in low light.
There are other ways to achieve the same result, but by far the easiest way is to use the Shutter Priority mode on your camera so because this is your first time we will be using that.
Shutter priority is labelled differently depending on your camera manufacturer. Here are some examples:
- Canon – Tv
- Pentax – Tv
- Nikon – S
- Sony Alpha – S
You can set your camera to the correct mode now and just leave it there. By doing so, you will have access to another control which sets the number of seconds that your shots will expose for and this is the bit you need to do in the dark – so check your manual if you’re not sure how to do this (each camera will be different). To keep things simple for now, you can also set your ISO to 100 or 200 as a starting point.
When and where to shoot your first long exposure
Most importantly, the when. Low light is critical (unless you’re using filters, but that’s a whole other topic) so any time before sunrise or after sunset is ideal. For the purposes of this exercise I’d recommend sunset as it gives you more time to play around and shoot into the night as the light fades (compared to at sunrise where you’ll have to pack up as soon as the sun comes up because it will be too bright by then).
As for where, the most dramatic effects are made when shooting a body of water like a lake or the sea, or a landscape where there is a lot of cloud and it is moving quite quickly. If you have a view over a city skyline nearby then thats also a great option – especially if you can incorporate water and clouds too!
Setting up and taking your shot
When we strip it all away, setting up your shot is actually quite straight-forward. You’ve already got your camera set to shutter priority, you’ve set your ISO, the next thing is just to put it on your tripod and point it in the right direction.
If it’s still quite light out, start off setting your shutter speed to around 2 seconds. This won’t capture much movement but it gives you a good starting point.
Next, take your shot!
Simple huh?
Well, technically that’s your first long exposure shot under your belt, but we won’t show this one to anybody so lets not count it…
For your next shot, move the shutter speed up to 5 seconds, then 10 seconds and keep moving up until you get to 30 second exposures.
If there is still a bit of daylight lingering around you might find that 30 seconds is too long and your camera either won’t let you take the shot, or it will let you but it will be over-exposed and way too bright. In this case, you will either need to set your ISO to a lower value, or if you’re already at the lowest ISO then you’ll just need to wait until it gets a bit darker.
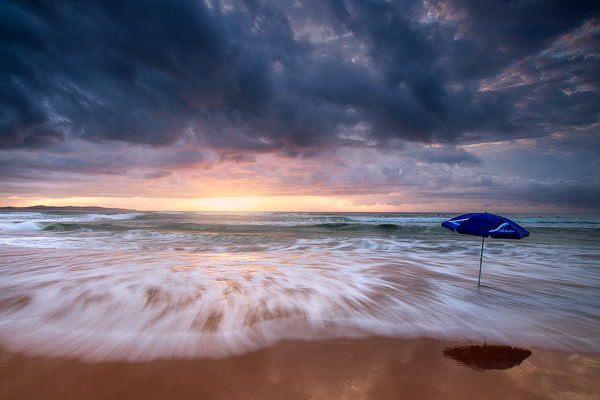
The shutter speed for this shot was 0.6 seconds, which was long enough to capture the movement in the in-rushing wave whilst retaining a lot of detail and shape
As you change up and start taking longer exposures you’ll see the movement within the scene becoming smoother and smoother whether its the waves in the water or the clouds in the sky.
It’s this effect that really amazed me the first time I saw it on my cameras LCD screen and really inspired me to “get into” photography.
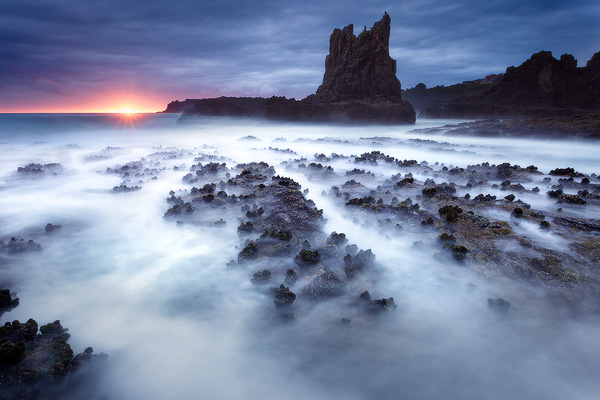
The 20-second exposure used in this shot completely flattened the water out and gave it that misty effect.
Some notes:
Most cameras will shoot up to a maximum of 30 or 60 seconds in Shutter Priority mode. If you want to do longer exposures than this then you have to use “Bulb” mode, which will be a topic for another day.
With this type of photography, when you press the button to take a photo you can end up introducing a bit of camera-shake and this can result in a less-than sharp photo. You can reduce camera-shake by setting your cameras timer so that it takes the photo either 2 or 10 seconds after you press the button, hopefully giving it enough time to stop wobbling.
If you find that your shots are too dark or too bright, the easiest way to adjust it is by using the Exposure Compensation setting which when put simply, tells the camera to take the photo either brighter or darker than it thinks that it should.
There are other (perhaps better) ways of taking long exposures and of course many more creative ways to use the technique, but this was how I personally discovered what was possible in what was probably my biggest “ah-ha” moment in photography.
Time for action
Hopefully this quick introduction to long exposures is enough to get you fired up to get out and try something new which as a result will give you the confidence to know that you can make interesting photos with lots of “wow factor!” (yeah wow factor sounds cheesy, please leave your suggestions for a better phrase in the comments 🙂 )
Pay attention to the difference between the same shot being taken at 2 seconds and at 30 seconds and try to figure out why the image is turning out how it is.
Once you have practiced this a few times the photos you are making will already be becoming more interesting as you experiment with different shutter speeds, subjects and lighting conditions and I dare you not to get addicted to the whole process!
To see more from Steve, head over to his web site at: www.stevearnoldphoto.com or say hi on his Facebook page here: www.facebook.com/stevearnoldphoto